Asp.net modules
  • Home
  • c# Modules
  • Web Design
    • Html
    • Css
    • Java Script
  • Bootstrap
  • Sql
    • Queries
    • Stored Procedures
  • About Me
    • About Myself
    • My Projects
    • My Resume
  • Photo Gallery

Monday, September 28, 2015

How to make a hit-dot game in Asp.net using Java-Script

 Unknown     3:22 AM     Asp.net     1 comment   


Introduction:


Hi.. Friends,

Today I explain that how to make a game in asp-dot net without using any database. Its so simple that we only create a outlook (design) of the game and simply we only insert a java-script in the same code. Now I going to explain the code of the making game.

Now I going to elaborate this step by step.

Step:1   The Design Code Goes Here


This code you only copy and paste in the html page its start working.

<center><h2 style="color: #249fa3">Hit-the-Dot</h2></center>
<center><b style="color: #249fa3">Test your skill.  How many boxes can you check in 30 seconds? 
    <br />
    </b></center>
<form name="cpanel">
<center>
<table cellspacing=3>
<tr>
<td><input type="button" name="startstop" value=" Start Game | Stop Game " onClick="play()" style="color: #FFFFFF; background-color: #249fa3; font-weight: bold;"></td>
<td><pre>    </pre></td>
<td align=right>Time:</td>
<td><input type="text" name="timeleft" size="4" onFocus="this.blur()"></td>
</tr>
<tr>
<td><input type="text" name="state" size="20" value="Push Start to Play" onFocus="this.blur()" style="color: #FFFFFF; font-weight: bold; background-color: #249fa3"></td>
<td><pre>    </pre></td>
<td align=right>Score:</td>
<td><input type="text" name="score" size="4" onFocus="this.blur()"></td>
</tr>
</table>
</center>
</form>
<form name="dmz">
<center>
<table cellspacing=3 style="background-color: #249fa3">
<tr>
<td colspan=10><hr size=1></td>
</tr>
<tr>
<td align="center" valign="center"><input type="radio" onClick="hithead(0)"></td>
<td align="center" valign="center"><input type="radio" onClick="hithead(1)"></td>
<td align="center" valign="center"><input type="radio" onClick="hithead(2)"></td>
<td align="center" valign="center"><input type="radio" onClick="hithead(3)"></td>
<td align="center" valign="center"><input type="radio" onClick="hithead(4)"></td>
<td align="center" valign="center"><input type="radio" onClick="hithead(5)"></td>
<td align="center" valign="center"><input type="radio" onClick="hithead(6)"></td>
<td align="center" valign="center"><input type="radio" onClick="hithead(7)"></td>
<td align="center" valign="center"><input type="radio" onClick="hithead(8)"></td>
<td align="center" valign="center"><input type="radio" onClick="hithead(9)"></td>
</tr>
<tr>
<td align="center" valign="center"><input type="radio" onClick="hithead(10)"></td>
<td align="center" valign="center"><input type="radio" onClick="hithead(11)"></td>
<td align="center" valign="center"><input type="radio" onClick="hithead(12)"></td>
<td align="center" valign="center"><input type="radio" onClick="hithead(13)"></td>
<td align="center" valign="center"><input type="radio" onClick="hithead(14)"></td>
<td align="center" valign="center"><input type="radio" onClick="hithead(15)"></td>
<td align="center" valign="center"><input type="radio" onClick="hithead(16)"></td>
<td align="center" valign="center"><input type="radio" onClick="hithead(17)"></td>
<td align="center" valign="center"><input type="radio" onClick="hithead(18)"></td>
<td align="center" valign="center"><input type="radio" onClick="hithead(19)"></td>
</tr>
<tr>
<td align="center" valign="center"><input type="radio" onClick="hithead(20)"></td>
<td align="center" valign="center"><input type="radio" onClick="hithead(21)"></td>
<td align="center" valign="center"><input type="radio" onClick="hithead(22)"></td>
<td align="center" valign="center"><input type="radio" onClick="hithead(23)"></td>
<td align="center" valign="center"><input type="radio" onClick="hithead(24)"></td>
<td align="center" valign="center"><input type="radio" onClick="hithead(25)"></td>
<td align="center" valign="center"><input type="radio" onClick="hithead(26)"></td>
<td align="center" valign="center"><input type="radio" onClick="hithead(27)"></td>
<td align="center" valign="center"><input type="radio" onClick="hithead(28)"></td>
<td align="center" valign="center"><input type="radio" onClick="hithead(29)"></td>
</tr>
<tr>
<td align="center" valign="center"><input type="radio" onClick="hithead(30)"></td>
<td align="center" valign="center"><input type="radio" onClick="hithead(31)"></td>
<td align="center" valign="center"><input type="radio" onClick="hithead(32)"></td>
<td align="center" valign="center"><input type="radio" onClick="hithead(33)"></td>
<td align="center" valign="center"><input type="radio" onClick="hithead(34)"></td>
<td align="center" valign="center"><input type="radio" onClick="hithead(35)"></td>
<td align="center" valign="center"><input type="radio" onClick="hithead(36)"></td>
<td align="center" valign="center"><input type="radio" onClick="hithead(37)"></td>
<td align="center" valign="center"><input type="radio" onClick="hithead(38)"></td>
<td align="center" valign="center"><input type="radio" onClick="hithead(39)"></td>
</tr>
<tr>
<td align="center" valign="center"><input type="radio" onClick="hithead(40)"></td>
<td align="center" valign="center"><input type="radio" onClick="hithead(41)"></td>
<td align="center" valign="center"><input type="radio" onClick="hithead(42)"></td>
<td align="center" valign="center"><input type="radio" onClick="hithead(43)"></td>
<td align="center" valign="center"><input type="radio" onClick="hithead(44)"></td>
<td align="center" valign="center"><input type="radio" onClick="hithead(45)"></td>
<td align="center" valign="center"><input type="radio" onClick="hithead(46)"></td>
<td align="center" valign="center"><input type="radio" onClick="hithead(47)"></td>
<td align="center" valign="center"><input type="radio" onClick="hithead(48)"></td>
<td align="center" valign="center"><input type="radio" onClick="hithead(49)"></td>
</tr>
<tr>
<td align="center" valign="center"><input type="radio" onClick="hithead(50)"></td>
<td align="center" valign="center"><input type="radio" onClick="hithead(51)"></td>
<td align="center" valign="center"><input type="radio" onClick="hithead(52)"></td>
<td align="center" valign="center"><input type="radio" onClick="hithead(53)"></td>
<td align="center" valign="center"><input type="radio" onClick="hithead(54)"></td>
<td align="center" valign="center"><input type="radio" onClick="hithead(55)"></td>
<td align="center" valign="center"><input type="radio" onClick="hithead(56)"></td>
<td align="center" valign="center"><input type="radio" onClick="hithead(57)"></td>
<td align="center" valign="center"><input type="radio" onClick="hithead(58)"></td>
<td align="center" valign="center" style="text-decoration: underline"><input type="radio" onClick="hithead(59)"></td>
</tr>
<tr><td colspan=10><hr size=1></td>
</tr></table></center></form>

<center><table cellspacing=3><tr><td><code>
<p style="color: #249fa3; font-weight: bold"><strong style="color: #249fa3">Instructions:</strong>
<ol style="color: #249fa3; font-weight: bold"><li>Click on the radio buttons as<BR>
they are selected randomly by the computer.<BR>
<li>1 point per hit, minus 1 point per miss.<BR>

</ol></td></tr></table></center>


Step:2   The Script Code Goes Here

This is a Java-Script you only paste this code in a head section of the same page. The whole code goes only a one page.


<SCRIPT LANGUAGE="JavaScript">
<!-- Begin
gamelength=30;
timerID=null
var playing=false;
var numholes=6*10;
var currentpos=-1;
function clrholes() {
for(var k=0;k<document.dmz.elements.length;k++)
document.dmz.elements[k].checked=false;
}
function stoptimer() {
if(playing)
clearTimeout(timerID);
}
function showtime(remtime) {
document.cpanel.timeleft.value=remtime;
if(playing) {
if(remtime==0) {
stopgame();
return;
}
else {
temp=remtime-1;
timerID=setTimeout("showtime(temp)",1000);
      }
   }
}
function stopgame() {
stoptimer();
playing=false;
document.cpanel.timeleft.value=0;
clrholes();
display("Game Over");
alert('Game Over.\nYour score is:  '+totalhits);
}
function play() {
stoptimer();
if(playing) {
stopgame();
return;
}
playing=true;
clrholes();
totalhits=0;
document.cpanel.score.value=totalhits;
display("Playing");
launch();
showtime(gamelength);
}
function display(msg) {
document.cpanel.state.value=msg;
}
function launch() {
var launched=false;
while(!launched) {
mynum=random();
if(mynum!=currentpos) {
document.dmz.elements[mynum].checked=true;
currentpos=mynum;
launched=true;
      }
   }
}

function hithead(id) {
if(playing==false) {
clrholes();
display("Push Start to Play");
return;
}
if(currentpos!=id) {
totalhits+=-1;
document.cpanel.score.value=totalhits;
document.dmz.elements[id].checked=false;
}
else {
totalhits+=1;
document.cpanel.score.value=totalhits;
launch();
document.dmz.elements[id].checked=false;
   }
}

function random() {
return(Math.floor(Math.random()*100%numholes));
}
// End -->

</script>

Demo :


Read More
  • Share This:  
  •  Facebook
  •  Twitter
  •  Google+

Sunday, September 27, 2015

How to use Session in ASP.net

 Unknown     2:57 AM     Asp.net     No comments   


Introduction:


Hi.. Friends,

Today I explain that how to use session in asp.net so here i cover all events of session step by step now i going to elaborate this.


Step:1         The designing code goes here.


<html xmlns="http://www.w3.org/1999/xhtml">

<head id="Head1" runat="server">

    <title>How to use session in ASP.net</title>

    <style type="text/css">

        .txtInput {

            width: 250px;

            height: 28px;
            padding: 3px;
        }

        div {
            margin: 5px;
        }

        .validator {
            color: Red;
        }
    </style>
</head>
<body>
    <form id="form1" runat="server">
        <div>
            <fieldset style="height: 281px; width: 1128px">
                <h3 style="color: #249fa3">How to use Session in ASP.net</h3>
                <div style="color: #249fa3; font-weight: bold">
                    Userame:<br />
                    <br />
                    <asp:TextBox ID="txtUserName" runat="server" MaxLength="50" Height="29px" Width="164px"></asp:TextBox>
                    <asp:RequiredFieldValidator ID="rfvFirstName" runat="server" Display="Dynamic"
                        CssClass="validator" ControlToValidate="txtUserName"
                        ErrorMessage="Username is required"></asp:RequiredFieldValidator>
                    <br />
                </div>
                <div>
                    <asp:Button ID="btnCreateSession" runat="server"
                        Text="Click to Create Session" OnClick="btnCreateSession_Click" BackColor="#249FA3" BorderColor="White" Font-Bold="True" ForeColor="White" Height="38px" />
                    &nbsp;
               
                    <asp:Button ID="btnRetrieveSession" runat="server" CausesValidation="false"
                        Text="Click to Retrieve Session Value" OnClick="btnRetrieveSession_Click" BackColor="#249FA3" BorderColor="White" Font-Bold="True" ForeColor="White" Height="38px" />
                    &nbsp;
               
                    <asp:Button ID="btnRemoveSession" runat="server" CausesValidation="false"
                        Text="Click to Remove Session Value" OnClick="btnRemoveSession_Click" BackColor="#249FA3" BorderColor="White" Font-Bold="True" ForeColor="White" Height="38px" />
                    &nbsp;
               
                    <asp:Button ID="btnRemoveAll" runat="server" CausesValidation="false"
                        Text="Click to Remove All Sessions" OnClick="btnRemoveAll_Click" BackColor="#249FA3" BorderColor="White" Font-Bold="True" ForeColor="White" Height="38px" />
                </div>
                <p style="color: #249fa3">
                    Note: Firstly create a session by providing user name in text field, then you can retrieve the value from session.
                </p>
                <div style="color: #249fa3">
                    Value stored in Session: 
               
                    <strong>
                        <asp:Label ID="lblSessionValue" runat="server"></asp:Label></strong>
                </div>
            </fieldset>
        </div>
    </form>
</body>
</html>


 Step:2     Add some header files as i given blow.


using System;
using System.Collections.Generic;
using System.Linq;
using System.Web;
using System.Web.UI;
using System.Web.UI.WebControls;


Step:3   The CS code goes here

public partial class index : System.Web.UI.Page

{
    protected void Page_Load(object sender, EventArgs e)
    {
    }

    protected void btnCreateSession_Click(object sender, EventArgs e)
    {
        Session["Username"] = txtUserName.Text.Trim();
    }

    protected void btnRetrieveSession_Click(object sender, EventArgs e)
    {
        DisplaySessionValue();
    }

    protected void btnRemoveSession_Click(object sender, EventArgs e)
    {
        Session.Remove("Username");

        DisplaySessionValue();
    }

    protected void btnRemoveAll_Click(object sender, EventArgs e)
    {
        Session.RemoveAll();

        DisplaySessionValue();
    }

    private void DisplaySessionValue()
    {
        if (Session["Username"] != null)
            lblSessionValue.Text = Convert.ToString(Session["Username"]);
        else
            lblSessionValue.Text = "No Value has been stored in session";
    }
}


Demo :


Read More
  • Share This:  
  •  Facebook
  •  Twitter
  •  Google+

Saturday, September 26, 2015

How to find results by click on dropdownlist selected value into a grid view?

 Unknown     6:37 AM     Asp.net     No comments   

Hi Friends... 


Here I explain full procedure of showing result on the selected value of dropdown in a grid view step by step on the onclick event.


Step 1: create a connection string in web.config  page


 <connectionStrings>
    <add name="conn" providerName="System.Data.SqlClient"
    connectionString="Data Source=Sk-Pc;uid=sa;pwd=12345;database=droplist"></add>
  </connectionStrings>


Step 2: create database  


Firstly  create a database and give it a name after then create a table I give it  UserDetail name and keep them allow null and auto increment the ID column.  


Step 3: HTML Design code goes here


<html xmlns="http://www.w3.org/1999/xhtml">

<head id="Head1" runat="server">

    <title></title>
    <style type="text/css">
        .p {
            padding: 55px 55px 55px 55px;
        }
    </style>

</head>

<body>

    <form id="form1" runat="server">

        <div style="border: 2px groove #249fa3; height: 128px; width: 193px;" class="p">

            <asp:DropDownList ID="DropDownList1" runat="server"
                OnSelectedIndexChanged="DropDownList1_SelectedIndexChanged" Font-Overline="False" Height="31px" Width="102px">
            </asp:DropDownList>

            <asp:Label ID="Label1" runat="server" Text=""></asp:Label>

            <br />

            <br />

            <asp:Button ID="Button1" runat="server" Text="Search" OnClick="Button1_Click1" BackColor="#249fa3" Font-Bold="True" ForeColor="White" Width="108px" Height="39px" />

            <br />

            <br />

            <asp:GridView ID="GridView1" runat="server" BackColor="White" BorderColor="#249fa3"
                BorderStyle="None" BorderWidth="1px" CellPadding="3" GridLines="Vertical">

                <AlternatingRowStyle BackColor="#249fa3" />

                <FooterStyle BackColor="#CCCCCC" ForeColor="Black" />

                <HeaderStyle BackColor="#249fa3" Font-Bold="True" ForeColor="White" />

                <PagerStyle BackColor="#999999" ForeColor="Black" HorizontalAlign="Center" />

                <RowStyle BackColor="#EEEEEE" ForeColor="Black" />

                <SelectedRowStyle BackColor="#249fa3" Font-Bold="True" ForeColor="White" />

                <SortedAscendingCellStyle BackColor="#F1F1F1" />

                <SortedAscendingHeaderStyle BackColor="#0000A9" />

                <SortedDescendingCellStyle BackColor="#CAC9C9" />

                <SortedDescendingHeaderStyle BackColor="#000065" />

            </asp:GridView>

        </div>

    </form>

</body>

</html>


Step 4: Add some header files


using System;
using System.Collections.Generic;
using System.Linq;
using System.Web;
using System.Web.UI;
using System.Web.UI.WebControls;
using System.Data.SqlClient;
using System.Data;


Step 5:   c# page code goes here


public partial class droplist : System.Web.UI.Page
{

    string str = ("Data Source=Sheetal;Initial Catalog=droplist;Integrated Security=True");

    protected void Page_Load(object sender, EventArgs e)
    {
        if (!IsPostBack)
        {
            SqlConnection con = new SqlConnection(str);

            string com = "Select * from UserDetail";

            SqlDataAdapter adpt = new SqlDataAdapter(com, con);

            DataTable dt = new DataTable();

            adpt.Fill(dt);

            DropDownList1.DataSource = dt;

            DropDownList1.DataBind();

            DropDownList1.DataTextField = "Name";

            DropDownList1.DataValueField = "ID";

            DropDownList1.DataBind();

        }
    }

    protected void Button1_Click1(object sender, EventArgs e)
    {

        SqlConnection con = new SqlConnection(str);

        SqlCommand cmd = new SqlCommand("select * from UserDetail where id = '" + DropDownList1.SelectedValue + "'", con);

        SqlDataAdapter Adpt = new SqlDataAdapter(cmd);

        DataTable dt = new DataTable();

        Adpt.Fill(dt);

        GridView1.DataSource = dt;

        GridView1.DataBind();

        Label1.Text = "record found";
        
    }

    protected void DropDownList1_SelectedIndexChanged(object sender, EventArgs e)
    {
        
    }
}


Demo :


Read More
  • Share This:  
  •  Facebook
  •  Twitter
  •  Google+

Friday, September 25, 2015

How To Bind A Repeater In Asp.Net

 Unknown     9:48 AM     Asp.net     No comments   

Introduction:


Hi.. Friends,

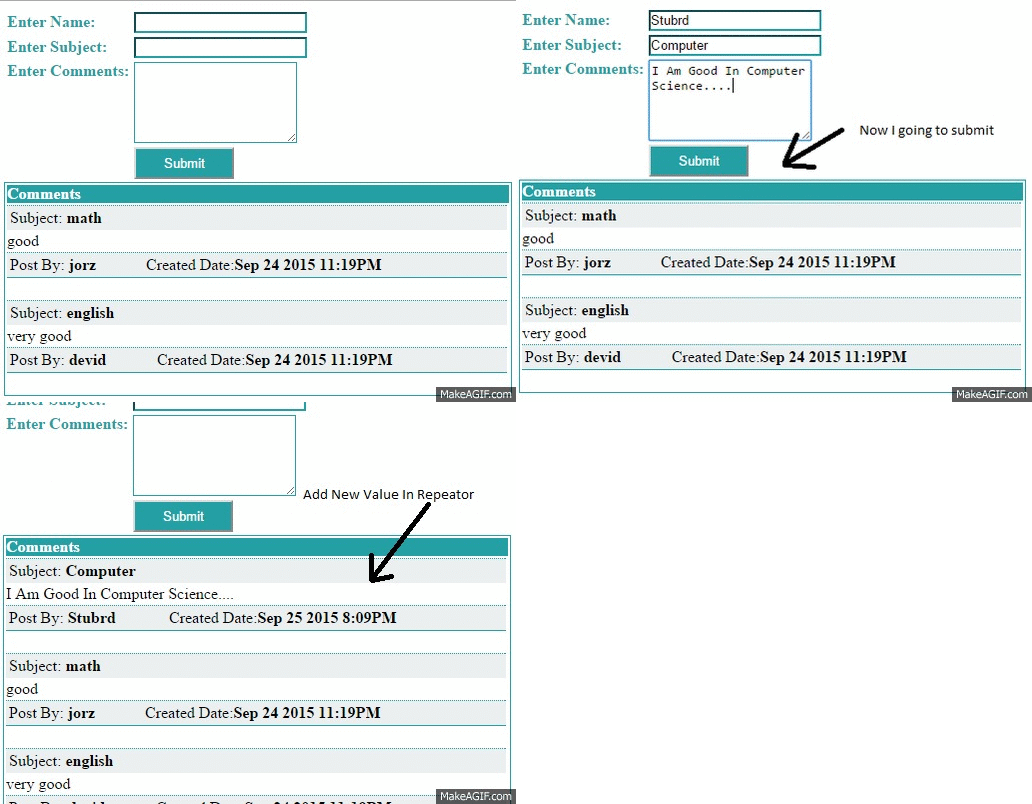
Today I explain that how to bind a repeater in asp.net . The process of binding a repeater is same as binding a grid view . Now i going to explain this process step by step.

Step:1

Firstly create a database and give it a name and then create a table I create a table and give it reptr name.


Step:2

The designing code goes here.


<html xmlns="http://www.w3.org/1999/xhtml">

<head id="Head1" runat="server">

<title>Repeator Control Example</title>

</head>

<body>

<form id="form1" runat="server">

<div>

<table>

<tr>

<td style="font-weight: bold; color: #249fa3">Enter Name: </td>

<td><asp:TextBox ID="txtName" runat="server" BorderColor="#249FA3"/></td>

</tr>

<tr>

<td style="font-weight: bold; color: #249fa3">Enter Subject: </td>

<td><asp:TextBox ID="txtSubject" runat="server" BorderColor="#249FA3"/></td>

</tr>
<tr>
<td valign="top" style="font-weight: bold; color: #249fa3">Enter Comments:</td>
<td><asp:TextBox ID="txtComment" runat="server" Rows="5" Columns="20" TextMode="MultiLine" BorderColor="#249FA3"/></td>
</tr>
<tr>
<td></td>
<td><asp:Button ID="btnSubmit" runat="server" Text="Submit" onclick="btnSubmit_Click" BackColor="#249FA3" ForeColor="White" height="32px"  width="100px"/></td>
</tr>
</table>
</div>
<div>
<asp:Repeater ID="RepDetails" runat="server">
<HeaderTemplate>
<table style=" border:1px solid #249fa3; width:500px" cellpadding="0">
<tr style="background-color:#249fa3; color:White">
<td colspan="2">
<b>Comments</b>
</td>
</tr>
</HeaderTemplate>
<ItemTemplate>
<tr style="background-color:#EBEFF0">
<td>
<table style="background-color:#EBEFF0;border-top:1px dotted #249fa3; width:500px" >
<tr>
<td>
Subject:
<asp:Label ID="lblSubject" runat="server" Text='<%#Eval("Subject") %>' Font-Bold="true"/>
</td>
</tr>
</table>
</td>
</tr>
<tr>
<td>
<asp:Label ID="lblComment" runat="server" Text='<%#Eval("Comment") %>'/>
</td>
</tr>
<tr>
<td>
<table style="background-color:#EBEFF0;border-top:1px dotted #249fa3;border-bottom:1px solid #249fa3; width:500px" >
<tr>
<td>Post By: <asp:Label ID="lblUser" runat="server" Font-Bold="true" Text='<%#Eval("UserName") %>'/></td>
<td>Created Date:<asp:Label ID="lblDate" runat="server" Font-Bold="true" Text='<%#Eval("PostedDate") %>'/></td>
</tr>
</table>
</td>
</tr>
<tr>
<td colspan="2">&nbsp;</td>
</tr>
</ItemTemplate>
<FooterTemplate>
</table>
</FooterTemplate>
</asp:Repeater>
</div>
</form>
</body>
</html>


Step:3

Add some header files as i given blow.

using System;
using System.Data;
using System.Data.SqlClient;


Step:4


The Cs code goes here.


public partial class reptr : System.Web.UI.Page
{
    private SqlConnection con = new SqlConnection("Data Source=Sheetal;Initial Catalog=droplist;Integrated Security=True");
    protected void Page_Load(object sender, EventArgs e)
    {
        if(!IsPostBack)
{
BindRepeaterData();
}
}


    protected void  btnSubmit_Click(object sender, EventArgs e)
{
        con.Open();
SqlCommand cmd = new SqlCommand("insert into reptr (UserName,Subject,Comment,PostedDate) values(@userName,@subject,@comment,@postedDate)", con);
cmd.Parameters.AddWithValue("@userName", txtName.Text);
cmd.Parameters.AddWithValue("@subject", txtSubject.Text);
cmd.Parameters.AddWithValue("@comment", txtComment.Text);
cmd.Parameters.AddWithValue("@postedDate", DateTime.Now);
cmd.ExecuteNonQuery();
con.Close();
txtName.Text = string.Empty;
txtSubject.Text = string.Empty;
txtComment.Text = string.Empty;
BindRepeaterData();
}
    protected void BindRepeaterData()
{
con.Open();
SqlCommand cmd = new SqlCommand("select * from reptr Order By PostedDate desc", con);
DataSet ds = new DataSet();
SqlDataAdapter da = new SqlDataAdapter(cmd);
da.Fill(ds);
RepDetails.DataSource = ds;
RepDetails.DataBind();
con.Close();
}
}


DEMO:


Read More
  • Share This:  
  •  Facebook
  •  Twitter
  •  Google+
Newer Posts Older Posts Home

Popular Posts

  • Asp.net insert, Edit, update, delete in grid view
    Introduction :   Here I explain how to insert, edit, update and delete data in grid view using asp.net. In this project I use so...
  • How to make a hit-dot game in Asp.net using Java-Script
        Introduction: Hi.. Friends, Today I explain that how to make a game in asp-dot net without using any database. Its so simple ...
  • Create a Cart Popup div in HTML & CSS
    Intoduction :-   Hii Friends... Today I explain how to Create a Cart Popup div in HTML & CSS . This moduel base on mouse hover when y...
  • How to create pikachu character using HTML & CSS
    Hii Friends... Today I explain how to create cartoon( Pikachu character) using HTML and CSS . you can use this code in your project cop...
  • Auto-Hiding Navbar with Javascript
    Intoduction :-   Hii Friends... today i explain how to hide a navbar when scroll the page. Fixed headers are fairly common nowadays with...
  • Angular Expressions
    Intoduction :-   Hii Friends... Today I explain about angular js expressions. this is similar to JavaScript expressions. 1) The expr...
  • How To scroll from bottom to top
    Intoduction :- Hii Friends...   Today I explain How To scroll from top to bottom and bottom to top, we use “scrollTop” function of jque...
  • How to create Animation Using HTML & CSS
    Hii Friends... Today I explain how to create Animations using HTML and CSS . you can use this code in your project copy this code and p...
  • How To Make Semi-Transparent Buttons
    Intoduction :-   Hii Friends...   Today I explain how to make Semi-Transparent Buttons with the help of css. This style now a days goes t...
  • List Style
    Intoduction :-   Hii Friends... Html have 2 types of list . Ordered List and Unordered List. If you are required to put your items in a n...

Blog Archive

  • ►  2017 (13)
    • ►  December (1)
    • ►  March (5)
    • ►  February (1)
    • ►  January (6)
  • ►  2016 (31)
    • ►  November (1)
    • ►  September (1)
    • ►  June (6)
    • ►  May (3)
    • ►  April (2)
    • ►  March (8)
    • ►  February (9)
    • ►  January (1)
  • ▼  2015 (31)
    • ►  December (3)
    • ►  November (4)
    • ►  October (18)
    • ▼  September (6)
      • How to make a hit-dot game in Asp.net using Java-S...
      • How to use Session in ASP.net
      • How to find results by click on dropdownlist selec...
      • How To Bind A Repeater In Asp.Net
      • How To Make A Responsive Grid System
      • Asp.net insert, Edit, update, delete in grid view

About Me

Unknown
View my complete profile

Copyright © Asp.net modules | Powered by Blogger
Design by Sheetal Khandelwal