Asp.net modules
  • Home
  • c# Modules
  • Web Design
    • Html
    • Css
    • Java Script
  • Bootstrap
  • Sql
    • Queries
    • Stored Procedures
  • About Me
    • About Myself
    • My Projects
    • My Resume
  • Photo Gallery

Monday, October 19, 2015

How to rotate the image with Css

 Unknown     7:28 AM     css     No comments   

Introduction :-

Hii Friends...
Today I explain how to rotate images with the help of css. And this work on mouse-over event. In this rotation we use angles like 360 degree 180 degree etc. so now I explain this step by step.

Step : 1   The Css goes here :->

Firstly we create a style-sheet and give it any name that you want only the extension give .css.


p#socialicons img{ /* 1st set of icons. Rotate them 360deg onmouseover and out */
-moz-transition: all 0.8s ease-in-out;
-webkit-transition: all 0.8s ease-in-out;
-o-transition: all 0.8s ease-in-out;
-ms-transition: all 0.8s ease-in-out;
transition: all 0.8s ease-in-out;
}

p#socialicons img:hover{
-moz-transform: rotate(360deg);
-webkit-transform: rotate(360deg);
-o-transform: rotate(360deg);
-ms-transform: rotate(360deg);
transform: rotate(360deg);

}

Step : 2   The Designing code goes here :->
<html xmlns="http://www.w3.org/1999/xhtml">
<head runat="server">
    <title>Asp.Net Modules</title>
    <link href="css/StyleSheet.css" rel="stylesheet" type="text/css" />
</head>
<body>
    <form id="form1" runat="server">
    <asp:Image ID="Image1" runat="server" />

    <div>
<p id="socialicons">
<a href="#">
<img border="0" src="rss.png" /></a>
<a href="#">
<img border="0" src="delicious.png" /></a>
<a href="#">
<img border="0" src="facebook.png" /></a>
<a href="#">
<img border="0" src="twitter.png" /></a>
<a href="#">
<img border="0" src="yahoo.png" /></a>
</p>
    </div>
    </form>
</body>

</html>

DEMO:-


Read More
  • Share This:  
  •  Facebook
  •  Twitter
  •  Google+

How to make Zoom-in and Zoom-out image with Css

 Unknown     7:10 AM     css     No comments   

Introduction :-

Hii Friends...

Today I explain how to make a image zoom-in and zoom-out with the help of Css. This Css works on mouse-over event. So now I explain this with step by step.

Step : 1   The Css goes here :->
Firstly we create a style-sheet and give it any name that you want only the extension give .css.

.opacity_img{
  opacity: 1.0;
  border-radius: 10px;
  border: groove;
 }
 .opacity_img:hover{
  cursor:pointer;
  opacity: 0.85;
  border-radius: 5px;
   }
 .zoom
 {
    opacity: 1.0;
  border-radius: 10px;
  border: groove;
   }
    .zoom:hover {
        cursor:pointer;
  opacity: 0.95;
  border-radius: 5px;
   transform:scale(1.05);
    -webkit-transform:scale(1.05);
 }

Step : 2   The Designing code goes here :->

<html xmlns="http://www.w3.org/1999/xhtml">
<head runat="server">
    <title>Asp.Net Modules</title>
    <link href="css/StyleSheet.css" rel="stylesheet" type="text/css" />
</head>
<body>
    <form id="form1" runat="server">
    <asp:Image ID="Image1" runat="server" />
    <div>
     <asp:Image ID="Image3" runat="server" 
            ImageUrl="~/1175248_562016663864760_1003157513_n.jpg" Width="174px" class="zoom" />
        <asp:Image ID="Image4" runat="server" 
            ImageUrl="~/546121_378895068891395_846850474_n.jpg" Width="174px" class="zoom" />
        <asp:Image ID="Image5" runat="server" 
            ImageUrl="~/579525_573727176006124_448400181_n.jpg" Width="174px" class="zoom" />
        <asp:Image ID="Image6" runat="server" 

            ImageUrl="~/1043870_698399306872243_1105324895_n.jpg" Width="174px" class="zoom"  />
</div>
    </form>
</body>

</html>

DEMO:-

Read More
  • Share This:  
  •  Facebook
  •  Twitter
  •  Google+

How to make hover on a image with css

 Unknown     6:20 AM     css     No comments   

Introduction :-

Hii Friends...
Today I explain how to make a hover on a image with the help of css (Cascading style sheet). And the hover works on mouse-over event.

Step : 1   The Code goes here :->

<html xmlns="http://www.w3.org/1999/xhtml">
<head>
   <style>
   img
   {
       opacity:0.4;
       filter:alpha(opacity=40);
   }
   img:hover
   {
     opacity:1.0;
     filter:alpha(opacity=100);  
   }
   </style>
</head>
<body>
<h1>image</h1>
<img src="download.jpg" width="150" height="100" alt="kk" />
<img src="Ebay-logo.jpg" width="150" height="100" alt="kk" />
</body>

</html>


(Here I give two css style one is for show clear image and second one is for fade the image now I show demo of this code. )

DEMO:-
1) The First Image Show Fade On Images


2) The Second Image Show Clear Image


Read More
  • Share This:  
  •  Facebook
  •  Twitter
  •  Google+

Tuesday, October 13, 2015

How To Make Tables In Sql

 Unknown     11:29 AM     tables     No comments   


Introduction:-

Hii Friends...
Today I explain how to create tables in sql. The first thing is what is sql ? The sql is the Structured Query Language. And in sql we can create many types of tables so i explain all types of tables.

Step:1    Firstly we create a table then we apply all types of queries on this table and give it a name. I give it  (customer) name.


Step:2    Now we can apply all queries.

1) Select :-

SELECT * FROM Customers;

Syntax :-

SELECT column_name,column_name
FROM table_name;

Examples:-

SELECT CustomerName,City FROM Customers;

Output:- All CustomerName and city will show.


How To Add a column in predefine Table 

 ALTER TABLE tblSubCategory
    ADD   Size varchar(50)


             OR

Alter table tblShopping_SellerProduct
Add EstimatedDays int not null default 0


Output:- Two extra columns are shows.

 How To Make a query for date filtering

 select * from tblMLM_EWalletTransaction where CONVERT(Date,Adddate,103) between CONVERT(Date,'" + txtfromdateEwallet.Text + "',103) and CONVERT(Date,'" + txttodateEwallet.Text + "',103)");


How To Make a Subquery 

select *,(select Firstname from tblShopping_Customer Where Msrno=s.SenderMsrno) as SenderName,
(select Firstname from tblShopping_Customer Where Msrno=s.ReceiverMsrno) as ReceiverName from tblsms as S

Read More
  • Share This:  
  •  Facebook
  •  Twitter
  •  Google+

Sunday, October 11, 2015

How to fill dropdown with one dropdown click

 Unknown     11:12 AM     js     No comments   

Introduction:-


Hii Friends....
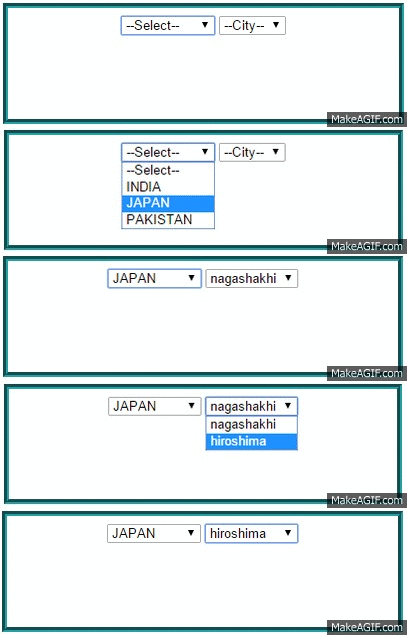
Today I explain how to fill a dropdown by click on other dropdown like we have two dropdowns one is for countries and second for cities and we want to fill city dropdown on the bases of country dropdown automatically fill. 


Step:1    The designing code goes here.

<html>
<script type= "text/javascript">
function fun(cc)
{
var s=document.myform.cities;
s.options.length=0;
if(cc=="")
{
s.options[s.options.length]=new Option('please select of any item ','');
}
else if(cc=="1")
{
s.options[s.options.length]=new Option('jaipur','');
s.options[s.options.length]=new Option('delhi','');
}
else if(cc=="2")
{
s.options[s.options.length]=new Option('nagashakhi','');
s.options[s.options.length]=new Option('hiroshima','');
}
else if(cc=="3")
{
s.options[s.options.length]=new Option('karachi','');
s.options[s.options.length]=new Option('multan','');
}

}

</script>
<body style="border:5px groove #249fa3; width: 391px; height: 111px; margin-left: 471px;">

<form name="myform">
<div align="center" style="padding-top:8px">
<select name="option"size="1"onchange="fun(this.value);">
<option value="0">--Select-- </option>
<option value="1">INDIA </option>
<option value="2">JAPAN </option>
<option value="3">PAKISTAN</option>
</select>

<select name="cities"size="1">
    <option value="0">--City-- </option>
</select>
</div>
</form>
</body>

</html>

Demo :-


Read More
  • Share This:  
  •  Facebook
  •  Twitter
  •  Google+

How To Make A Bill with JavaScript

 Unknown     10:08 AM     js     No comments   

Introduction:-

Hii Friends....

Today I explain how to make a bill using simple html and javascript . Here i use some functions and some html part for designing purpose . So here I explain step by step this task.

Step:1    The designing code goes here.

<head>
<title> Asp.Net Modules </title>
</head>
<center>
<script type="text/javascript">
function pp()
{
 window.print();
}
</script>
<script type="text/javascript">
function pizza()
{
if(document.getElementById('p1').checked==true)
{
 var a=document.getElementById('i1').value;
 var b=document.getElementById('q1').value;
 if(b=="")
 {
 alert("Enter qua");
 }
 else
 {

 var c=Number(a)*Number(b);
 document.getElementById('a1').value=c;
 }
 }
}
function burger()
{
  
 var a=document.getElementById('i2').value;
 var b=document.getElementById('q2').value;
 if(b=="")
 {
 alert("Enter qua");
 }
 else
 {

 var c=Number(a)*Number(b);
 document.getElementById('a2').value=c;
 }
}
function sticks()
{
 var a=document.getElementById('i3').value;
 var b=document.getElementById('q3').value;
 if(b=="")
 {
 alert("Enter qua");
 }
 else
 {

 var c=Number(a)*Number(b);
 document.getElementById('a3').value=c;
 }
}
function frenchfry()
{
 var a=document.getElementById('i4').value;
 var b=document.getElementById('q4').value;
 if(b=="")
 {
 alert("Enter qua");
 }
 else
 {

 var c=Number(a)*Number(b);
 document.getElementById('a4').value=c;
 }
}
function totalamount()
{
  var a=document.getElementById('a1').value;
  var b=document.getElementById('a2').value;
  var c=document.getElementById('a3').value;
  var d=document.getElementById('a4').value;
  var tt=Number(a)+Number(b)+Number(c)+Number(d);
  document.getElementById('total').value=tt;
var abc=document.getElementById('tp').value;
var per=tt*abc/100; 
document.getElementById('per').value=per;


var cc=Number(tt)+Number(per); 
 document.getElementById('gross').value=cc;
 }
</script>
<table border=2 bgcolor=gray>
<tr>
<td>Name of Rec</td>
<td><input type=text id=n value=Name onfocus="if(this.value=='Name'){this.value=''}"onblur="if(this.value==''){this.value='Name'}"></td>
</tr>
<tr>
<td>Time</td>
<td><input type=text id=c></td>
<td><input type=button value=print onclick=pp()></td>
</tr>
<tr>
<table border=2>
<tr>
<td>ItemName</td>
<td>Price</td>
<td>Qua</td>
<td >Amount</td>
</tr>
<tr>
<td>
<input type=checkbox id=p1 onchange=pizza()>Pizza
</td>
<td><input type=text value="100" id=i1 disabled></td>
<td><input type=text id=q1></td>
<td><input type=text id=a1 disabled></td>
</tr>
<tr>
<td>
<input type=checkbox id=p2 onchange=burger()>Burger
</td>
<td><input type=text value="100" id=i2 disabled></td>
<td><input type=text id=q2></td>
<td><input type=text id=a2 disabled></td>
</tr>
<tr>
<td>
<input type=checkbox id=p3 onchange=sticks()>Sticks
</td>
<td><input type=text value="100" id=i3 disabled></td>
<td><input type=text id=q3></td>
<td><input type=text id=a3 disabled></td>
</tr>
<tr>
<td>
<input type=checkbox id=p4 onchange=frenchfry()>FrenchFry
</td>
<td><input type=text value="100" id=i4 disabled></td>
<td><input type=text id=q4></td>
<td><input type=text id=a4 disabled></td>
</tr>
<tr>
<td colspan=3>
<div align=right>
TOTAL
</div>
</td><td><input type=text id=total disabled></td>
</tr>
<tr>
<td colspan=2>Enter Tax Per
</td>
<td><input type=text id=tp value="12">
</td>

<td>
<input type=text id=per disabled>
</td>
</tr>
<tr>   
<td colspan=3 ><div align=right><input type=button value=pay onclick=totalamount()></td>
</div>


<td>
<input type=text id=gross disabled>
</td>
</tr>
<tr>
<tr></tr>
</tr>         
</table>
</tr>
</table>
<script type="text/javascript">
function clock() 
{
   var now = new Date();
   var outStr = now.getHours()+':'+now.getMinutes()+':'+now.getSeconds();
   document.getElementById('c').value=outStr;
   setTimeout('clock()',1000);
}
clock();
</script>

</center>

Demo :-

                                                [1]   Firstly enter the quantity of the items.


  [2]   Check that items you want .


  [3]   Click on pay button and you can get print of the bill.


Read More
  • Share This:  
  •  Facebook
  •  Twitter
  •  Google+
Newer Posts Older Posts Home

Popular Posts

  • How to make color picker
    Intoduction :-   Hii Friends... Today i going to put a very interesting module i.e how to make a color picker module. Its very interesti...
  • Bounce a circle with Css
    Intoduction :-   Hii Friends... Today I explain how to make a bouncing circle with the help of css.  DEMO:- ...
  • Bootstrap Model
      Intoduction :-   Hii Friends... Today I explain how to make a bootstrap model in asp.net . Its not so complicated its easy. here som...
  • Angular Directives
    Intoduction :-   Hii Friends... Today I explain about Angular Directives.  1) Angular JS use new attribute i.e called Directives. 2)...
  • Asp.net insert, Edit, update, delete in grid view
    Introduction :   Here I explain how to insert, edit, update and delete data in grid view using asp.net. In this project I use so...
  • Angular Js Introduction
    Intoduction :-   Hii Friends... Today I explain about angular js. Angular js is a part of javascript but its extended. 1 ) AngularJS ...
  • How To Make Semi-Transparent Buttons
    Intoduction :-   Hii Friends...   Today I explain how to make Semi-Transparent Buttons with the help of css. This style now a days goes t...
  • css Hovering Bounce
    Intoduction :-   Hii Friends... Today I explain how to make css hovering fill circle  boundary with images bounce . hover selector is us...
  • Border style in css
    Introduction :- Hii Friends... Today I explain how to make many types of borders in asp.net with the help of css. so now I explain this...
  • Calculator with Angular JS
    Intoduction :-   Hii Friends... Today I explain how to make a Calculator with the help of Angular JS. In this code i use some directive...

Blog Archive

  • ▼  2017 (13)
    • ▼  December (1)
      • Awarepedia services
    • ►  March (5)
    • ►  February (1)
    • ►  January (6)
  • ►  2016 (31)
    • ►  November (1)
    • ►  September (1)
    • ►  June (6)
    • ►  May (3)
    • ►  April (2)
    • ►  March (8)
    • ►  February (9)
    • ►  January (1)
  • ►  2015 (31)
    • ►  December (3)
    • ►  November (4)
    • ►  October (18)
    • ►  September (6)

About Me

Unknown
View my complete profile

Copyright © Asp.net modules | Powered by Blogger
Design by Sheetal Khandelwal